Hey all my Nonfiction Friends… Many teachers who are on the fence about purchasing the bundle e-mail me with questions on how to organize, plan, and implement the different units included. I wanted to dedicate a blog post to answering those questions. If you haven’t purchased the bundle because you’re hesitant of how to make it work in your classroom or you’re unsure of what all is included, this post is for you! If you have purchased the bundle, I hope this post helps to guide you even further in your classrooms.


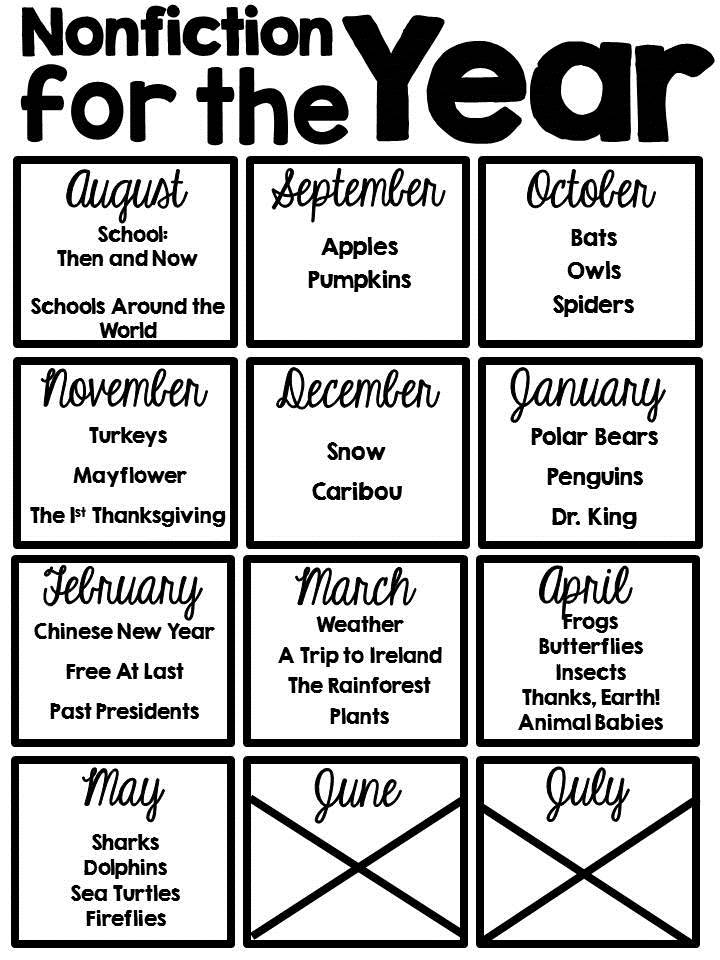
The bundle is big! It’s a collection of 31 nonfiction topics.

All of the different nonfiction packets have the same type of activities. The layouts are also the same for each packet. The only thing that changes is the content itself. This means student get to spend more time knee deep in each activity and less time figuring out HOW to do it. This familiarity will only increase students’ independence and confidence! Each of the 35 packets include the following: Vocabulary posters and mini vocabulary cards (real photographs help students better grasp these words) All About _____ article pages – These article pages were designed as a way for you to “hook” your students at the beginning of your unit. You can display the article pages on your document camera as a whole group or print and display during small group instruction.
Differentiated All About ____ Mini-Books – These are differentiated mini-books that can be used during small group instruction.There are three versions. Each version is slightly easier than the last. I wanted to give you options because I know that many of our students come in reading at different ability levels. It is up to you to pick and choose which articles you use with your groups. You can either print in color and laminate or print them in grayscale. Text-Dependent Response sheets follow! Close Reading Passages: These articles are PERFECT to use for “close reading beginners” or “close reading masters.” These were designed to help you and your students get into the groove of closely reading a text that requires multiple reads and answering text-dependent questions.These can either be done together in small group OR with guided support. Questions about each close reading passage are included. Graphic organizers, vocabulary books, and independent practice sheets to be used however you wish! There are many different options to help meet the needs of your diverse group. True/False Sort: After learning facts about the topic, students will sort the sentences according to whether they are true or false. I’ve also provided a cut/paste sheet too that requires students to read simple sentences and glue them in the correct column.

Sabrina asks, “For each of your Nonfiction Resources how long should we plan for? A week, 2 weeks, or longer?” This is really up to you and how much time you can dedicate to each topic. There is a lot of flexibility with the units. You could spend a few days, a week, or even a couple weeks on each unit. I wrote out a suggested timeframe below and what to do on each day. These are just suggestions though. I’m sure you all have incredible ideas on how to use these resources!

I’ve found the easiest way to organize all of the master copies, posters, and mini-books for each nonfiction unit is to place them all in a large Ziploc. Then, hole punch the Ziploc and place it in a 3 inch binder, like you see below.

I also suggest writing down the books you used to teach the unit on a little Post-It note and slip it inside the bag. Then when you pull out the unit next year, you’ll know which books you will need. Easy peasy! 

Another suggestion is to place the current unit materials in bins and set them near your small group table. You can download the labels for free here. I placed all of the close reading articles and response sheets that correlate with them in the first bin. The second bin includes all of the vocabulary books that students will use in small group. The third bin has a collection of books that correlate with the unit. The last bin has many different graphic organizer
options.

Then, all you have to do is quickly grab what you need and make necessary copies. Done and done! 


Whole Group: 15-20 minutes MAX Introduce the new topic. I would suggest creating a large anchor chart, similar to the one below. It doesn’t have to be anything fancy! Brainstorm words about the topic on the chart and allow opportunities for students to turn and talk using the prompt, “When I think of ______(nonfiction topic), I think of ________.” Record their ideas on the chart paper. This is an easy way to assess what they already know about the topic! You could also do a K-W-L, Can/Have/Are, or an I Wonder/I Learned chart.


This is the day we dive into differentiated small group time. I like to think of this day as the day we “get our feet wet.” Prior to any small group time, I always like to refer to my handy-dandy posters in my small group area. I especially like these ones below. The “What is Nonfiction?” definition poster comes from here. The “Five Close Talk Guidelines” and the “Be an Active Participant” posters can be found for free here. These act as great reminders and reference sheets for you and your students!

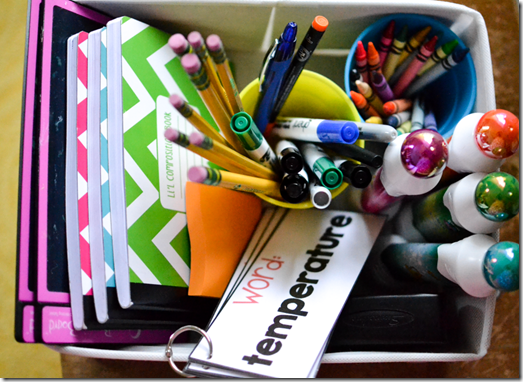
I also suggest having all of your small group materials that you and your students will need nearby. Some good materials to keep close by are: the vocabulary cards you’ll be referring to while reading, boogie boards, post-it notes, daubers, crayons, pencils (fat and skinny ones), pens (for you to use), highlighters, magnetic letters, and dry erase markers and boards. I also like to have little notebooks because sometimes kids just want to go old school and use pencil and paper!


We all have different organization systems that work for us. Something that has always worked for me is to keep all my small group materials in bins like the ones below. The labels are color-coded and easy to spot. That way, when you call a group over to meet with you, you don’t have to spend a lot of time shuffling around for papers. The bins are labeled below with the following letters: A = Approaching grade level O = On grade level B = Beyond grade level If you want to grab these labels, feel free to snatch them here.


The bins are perfect for holding the mini-books and the organizers/text-dependent questions you’ll be using. Just grab and teach! All of the mini-books have the exact same covers (students won’t stress about why their book is
different from another classmates).


Below you’ll find some information about the leveled mini-books. The mini-books are differentiated to meet the needs of your students. About the Approaching Grade Level Mini-Books: The “Approaching” grade level mini-books were written for students reading below grade level. The text complexity in these books is not TOO challenging and the amount of text is not TOO overwhelming. About the On Grade Level Mini-Books: The “On” grade level mini-books were written for students reading at a first grade reading level. You will notice that the text complexity is a bit more challenging. Also, the amount of text has increased from the below grade level books. About the Beyond Grade Level Mini-Books: The “Beyond” grade level mini-books were written for students reading above a first grade reading level. The text is much more complex. Words with more challenging spelling patterns are added. You may want to put a little dot or letter on the back corner of the books to help keep you organized. 
Here are some examples of the mini-books that are included in each nonfiction unit. The top books are the “Beyond grade level” books, the middle books are the “On grade level” books, and the bottom books are the “Approaching grade level” books.


I suggest providing no frontloading prior to reading the mini-books the first day. I would have students whisper read (not choral read) the text. This way you can stop and provide one-on-one support when needed. During any first read, I suggest spending a good chunk of time focusing on phonics skills and word attack strategies. I like to provide students with sticky notes so that they can easily jot down unknown words and mark parts of the text that gave them trouble. I also like to provide them with dry erase markers and white boards or the boogie boards. These can be used to build unknown words and look for familiar phonics patterns. During the first read, I suggest having a brief discussion about the text. Plan on having a more in-depth discussion during the second read.
Now it’s time to do some vocabulary development. Have students carefully look back at any words they circled/made note of when they read the text the first day. Use the vocabulary posters and cards provided for you to uncover the meaning of the words with your students. I like to first show students JUST the word and try to have them read it without any support from me. Next, I have them go back to the text to see if they can use context clues to figure out the meaning. Then, I show them a picture of the word and we talk out loud about what we see in the photograph. From there we come up with ideas of what the word could mean. Finally, we read the definition of the word. I use a piece of paper to cover up the parts that I don’t want shown. As I reveal each part, I just slide the sheet down. 


These are the cards I mentioned above. The word, picture, and definition are all on separate cards. These are very convenient to use during small group. 


As you re-read the text the second time, I suggest stopping many times along the way to discuss and ask text-dependent questions. I know text-dependent questions are sometimes hard to think of so I provide many different text-dependent question sheets in all of the nonfiction packets.
Key Points During This Read: – re-read meaty sections for clarification
-look closely at vocabulary terms
-teacher is facilitating discussion and asking text-dependent questions After reading, I like to choose one text-dependent question that we will answer in our writing together. For the “Approaching” group, I like to give a sentence starter. For all of the groups, I like to provide sticky notes so that they can easily mark any pages that they felt were important in providing evidence. Also, if students get discouraged, it’s sometimes helpful to guide them to a particular section or page so they can closely read it again. When writing, I think it’s important to have students do “think aloud writing” before actually writing anything down. This allows students to organize their ideas before writing them on paper. Afterwards, or on a separate day, allow students to independently answer one of the text-dependent sheets.


All of the nonfiction units also include relevant, meaningful, and engaging activities for your students to work on while you’re meeting with groups. Below you’ll find some ideas on how to use those activities.
All of the units include vivid and captivating real-life photographs that can be used as inspiration at the writing station.


A fun idea that a follower shared with me is to print the covers of the nonfiction resources that you have studied and add writing paper to the back of them to create a “class magazine.” Students can write about facts that they learned or make up a story about what they learned during the unit. 
After you’ve finished with the mini-books in small group, add them to your writing station too. This way students can refer back to the books when they’re writing in the “class magazines.” 
Imagine all of the cool “class magazines” that your students could write!

A good tip is to have visuals in your writing area to help your students when writing to inform. These act as great “teacher assistants” to help keep students on the “write” track while you’re meeting with groups. You can grab the posters and writing prompts here and here.

I also provide letter writing paper for students who want to write about their imaginative journeys and adventures to new places. Students can refer to the letter helper to guide them along. Grab “Meet the Letter Helper” and the writing pencil here.

In each of the nonfiction units, I provide true/false sorting cards. Your students could sort these in a pocket chart or on the floor. Students could work together in pairs or bundles of three. I like to include one or two of the mini-books in the basket so that they can refer back to the text if they need to. 


These close read articles could be used in many different ways. Students could read them in small group time with you, independently, with a partner, or in groups. One fun idea that allows you to mix up all different abilities in your class is to break students into small heterogeneous groups and give them an article, books about the topic, and direct them to interesting websites.
They can read and collect information about the topic and record their findings on the organizers that are provided in all of the packets.


After students have become experts on their topic by researching and collaborating, I like to have them “present” their topic to another group. This could be as simple as “mix and mingling” the class and allowing students to take turns sharing. Or, if you have a little more flexibility with time, they could make a poster about their topic, record themselves using iPads, make a brochure, write a summary, or even use a website, like Powtoon. In each unit, you can find many great videos and books to help get you started. You can find the links on the Teacher To Do page that looks like this:

This is Powtoon (as mentioned above). It’s an awesome and easy to navigate site that your students can use to display their findings!

I hope this post was helpful and answered some of your questions. What other questions do you still have about the bundle? Leave them in the comment section!
Here’s what others have said about the bundle: I have purchased each non fiction packet you’ve loaded this year. They’re engaging and consistent. The kids can focus on the content rather than the expectation of how to complete the activity. I had a parent ask what I’ve done to increase her child’s reading. Honestly, the differentiated passages in small groups. Great job! I absolutely love your non-fiction sets! I teach ESOL and my students love the pictures and true/false game! We use it as a review before our end of unit test that I create. I already have your bat and turkey units and I am so glad to be able to get all of the future bundles, too! I love the differentiated texts, too! They are great in my small groups because my more proficient students can read the hardest text independently while I work one on one with other students who are entering or have limited language proficiency. Thanks for offering this set! I’m excited to see all of the great things you will include! 🙂 I was so excited to see this HUGE bundle! Now I have quality resources for the entire year! My kids especially love the real life pictures and mini books. My favorite part of your bundles are the differentiated booklets. Knowing that I have readable informational text for my kids in any grade I may teach in the future puts me at ease.
This bundle is a steal at this price and I could NOT pass it up. Can’t wait to see the future units you add to this product. It’s like a gift that keeps on giving 🙂 Thank you so much for putting together this bundle of non fiction reading! I bought the Pumpkin Unit this fall and my students learned so much information about pumpkins. We play a game called ‘stump the parents’ and your unit sure gave my kiddos lots of information to test their parents’ knowledge on pumpkins. I’m getting ready to teach the Caribou Unit and know they will love learning with your unit! I can’t wait to teach all of the units you made in this bundle. Each unit is packed full of facts and the photographs are so beautiful and what rich color! My kids really love to find the meaning, picture, and word match.
Thank you again and keep creating!!